

Delightful Dutch Apple Pie Tartlets: A Must-Have for Your Holiday Potluck
Indulge in the delectable world of Dutch Apple Pie Tartlets, a must-have treat for your holiday potluck. These miniature delights combine the classic flavors of a traditional Dutch apple pie with the convenience and charm of individual tartlets. With a flaky crust, a luscious spiced apple filling, and a crunchy streusel topping, these tartlets are sure to impress your guests and leave them craving for more. Whether served as a sweet ending to a festive meal or enjoyed with a cup of warm cider, Dutch Apple Pie Tartlets are the perfect way to spread joy and delight during the holiday season.
1. Introduction: The Irresistible Charm of Dutch Apple Pie Tartlets
Ah, the holidays. A time for cozy sweaters, twinkling lights, and of course, irresistible desserts. And what better way to delight your taste buds than with a batch of homemade Dutch Apple Pie Tartlets? These miniature treats pack all the charm and deliciousness of a classic Dutch Apple Pie, but in a cute and convenient individual serving size. Whether you’re attending a holiday potluck or just craving a sweet treat, these tartlets are a must-have addition to your dessert repertoire.
2. A Classic Recipe with a Twist: Dutch Apple Pie Tartlet Ingredients and Preparation

2.1 Selecting the Perfect Apples
The key to a delightful Dutch Apple Pie Tartlet lies in choosing the perfect apples. Look for varieties that are both firm and tart, such as Granny Smith or Honeycrisp. These apples hold their shape while baking and provide a nice contrast to the sweet and buttery filling.
2.2 The Essential Ingredients for the Tartlet Shell
To create the flaky and buttery tartlet shells, you’ll need a handful of essential ingredients. Flour, butter, sugar, salt, and a touch of cold water are the building blocks of a perfect crust. Don’t forget to keep your butter chilled to ensure the flakiest results.
2.3 Spice it Up: Key Ingredients for the Apple Filling
The star of any Dutch Apple Pie Tartlet is, of course, the apple filling. Besides the aforementioned apples, you’ll need a medley of warm spices such as cinnamon, nutmeg, and a pinch of cloves. A squeeze of lemon juice helps to brighten the flavors, while brown sugar adds depth and sweetness. And for that extra oomph, a handful of raisins or dried cranberries can take your filling to the next level.
3. Perfecting the Flaky Crust: Tips and Techniques for Tartlet Shells
3.1 The Importance of Chilled Ingredients
When it comes to making the flakiest tartlet shells, keeping your ingredients cold is crucial. Cold butter ensures that it doesn’t melt too quickly, resulting in a more tender and delicate crust. So, pop your butter in the fridge beforehand and even chill your mixing bowl and utensils for good measure.
3.2 Mastering the Tartlet Shell Dough
To create a tender and flaky tartlet shell, it’s important not to overwork the dough. Use a light touch when blending the butter into the flour mixture, stopping when the mixture resembles coarse crumbs. Adding just enough cold water to bring it all together will give you that perfect balance of tenderness and structure.
3.3 Rolling and Shaping the Tartlet Shells
When it’s time to roll out your tartlet dough, aim for a thickness of about 1/8 inch. Gently press the dough into your tartlet pans, making sure to evenly distribute it and mold it to the shape of the pan. Trim any excess dough and use a fork to create decorative edges. Voila! You’re on your way to flaky tartlet perfection.
4. The Apple Filling: Selecting the Best Apples and Creating a Delicious Spiced Filling

4.1 Crisp and Tart or Sweet and Juicy: Choosing the Right Apple Variety
When it comes to the apple filling, you have the power to choose your flavor profile. If you prefer a tangy and crisp filling, opt for Granny Smith apples. For those who crave a sweeter and juicier filling, varieties like Honeycrisp or Fuji will do the trick. Feel free to experiment and find your perfect apple balance.
4.2 Enhancing Flavor with Spices and Sweeteners
To take your apple filling to the next level, it’s all about the spices and sweeteners. A generous sprinkle of cinnamon adds warmth and depth, while a touch of nutmeg and cloves brings that cozy holiday vibe. Brown sugar provides a rich caramel-like sweetness, but don’t forget the squeeze of lemon juice to balance it all out. It’s the little details that make these tartlets truly delightful.
Now that you’re armed with all the tips and tricks, it’s time to embark on your Dutch Apple Pie Tartlet adventure. Get ready to impress your friends and family with these miniature bites of holiday happiness. Happy baking!
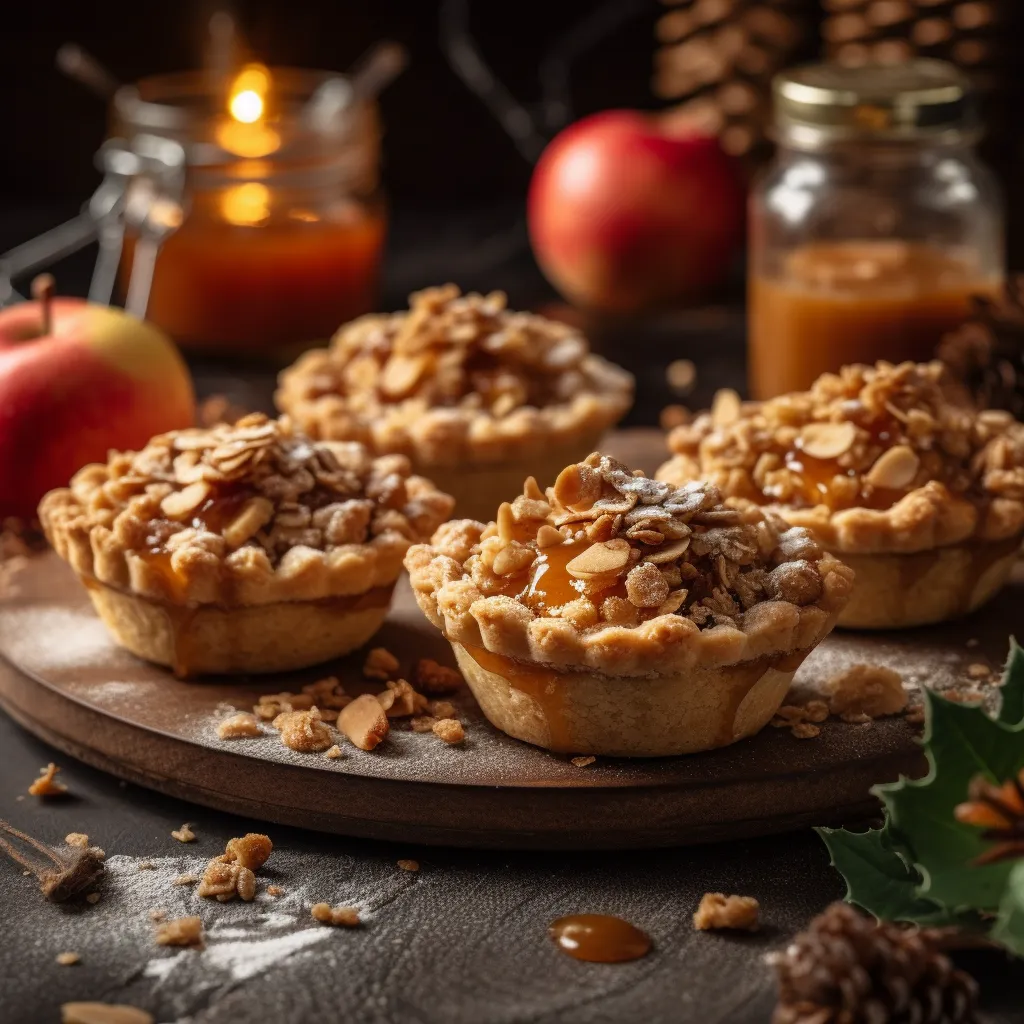
5. Dutch Streusel Topping: Adding the Perfect Crunch and Sweetness
If there’s one thing that takes these Dutch Apple Pie Tartlets from good to absolutely amazing, it’s the irresistible streusel topping. This crunchy and sweet layer adds a delightful texture and enhances the overall flavor profile of the tartlets. So, let’s dive into the key components and the simple process of mixing and applying this heavenly topping.
5.1 The Key Components of a Delicious Streusel Topping
The beauty of a streusel topping lies in its simplicity. You only need three ingredients to create this crunchy goodness: butter, flour, and sugar. The butter brings richness, the flour provides structure, and the sugar adds that delectable sweetness. It’s like a trifecta of flavor that perfectly complements the tender apple filling.
5.2 Mixing and Applying the Streusel
Mixing the streusel is as easy as it gets. In a bowl, combine the flour and sugar, then cut in the cold butter using a pastry cutter or your fingertips until the mixture resembles coarse crumbs. Don’t worry about getting it perfectly uniform; a few larger chunks of butter will create extra pockets of deliciousness.
Once the streusel mixture is ready, generously sprinkle it over the apple-filled tartlet shells. You want a nice thick layer to ensure that satisfying crunch in every bite. Gently press the streusel into the apple filling, so it holds together while baking. Now, your tartlets are ready to transform into golden perfection in the oven!
6. Baking and Serving: Step-by-Step Instructions for Golden and Gooey Tartlets
Now that your tartlets are assembled and topped with that glorious streusel, it’s time to bake them to golden perfection. Follow these simple steps to achieve tartlet greatness.
6.1 Preparing and Preheating the Oven
Before diving into baking, preheat your oven to the recommended temperature. This ensures that the pastry crust bakes evenly and the tartlets cook to perfection. While the oven is doing its thing, take this opportunity to prepare a baking sheet lined with parchment paper or a silicone baking mat. This will prevent any sticky situations and make cleaning up a breeze.
6.2 Assembling and Baking the Tartlets

Carefully transfer your assembled tartlets to the prepared baking sheet. Make sure they have enough space between them for hot air to circulate, allowing for even baking. Pop them into the preheated oven and let the magic happen. The tantalizing aroma of warm apple, cinnamon, and buttery pastry will fill your kitchen and have everyone eagerly waiting.
The baking time will depend on your recipe, but be sure to keep an eye on them. You’ll know they’re ready when the streusel turns golden brown and the apple filling is bubbly and gooey. It’s a sight that’ll make you want to jump straight into the oven, but exercise patience – they need a few minutes to cool down.
6.3 Serving and Enjoying the Warm Delight
Once your tartlets have cooled slightly, it’s time for the most satisfying part – enjoying them! Serve these delectable treats warm for the ultimate sensory experience. The crisp pastry, the heavenly apple filling, and the delightful streusel will dance on your taste buds, making every bite a moment to cherish. Be prepared for requests for seconds because these tartlets are simply irresistible.
7. Elevating Your Tartlets: Optional Garnishes and Serving Suggestions
While these Dutch Apple Pie Tartlets are already a showstopper on their own, you can take them to the next level with a few optional garnishes and serving suggestions.
7.1 Adding a Dollop of Whipped Cream or Vanilla Ice Cream
Take your tartlet from delightful to divine by adding a dollop of freshly whipped cream or a scoop of smooth vanilla ice cream on top. The creamy coolness beautifully contrasts the warm tartlet, creating a delightful balance of flavors and textures. It’s the perfect finishing touch.
7.2 Drizzling Caramel Sauce or Homemade Salted Caramel
For those craving an extra touch of decadence, drizzle some luscious caramel sauce or homemade salted caramel over your tartlets. The buttery sweetness of the caramel combined with the buttery streusel and tender apples is a match made in dessert heaven.
7.3 Pairing with a Warm Beverage
To complete the experience, pair your Dutch Apple Pie Tartlets with a cozy warm beverage. Whether it’s a hot cup of cider, a steaming mug of coffee, or a comforting sip of tea, the combination will make you feel all warm and fuzzy inside. It’s the perfect way to savor every moment of this delightful treat.
With their buttery crust, gooey apple filling, and irresistible streusel topping, these Dutch Apple Pie Tartlets are a must-have for your holiday potluck. They are easy to make, bursting with flavor, and will bring smiles to everyone’s faces. So, follow our simple steps, add those optional garnishes if you’re feeling fancy, and get ready to share the joy of these delightful tartlets with your loved ones.
8. Conclusion: Sharing the Joy of Dutch Apple Pie Tartlets at Your Holiday Potluck
In conclusion, Dutch Apple Pie Tartlets are a delightful treat that will make your holiday potluck truly memorable. The combination of flaky crust, spiced apple filling, and crunchy streusel topping creates a symphony of flavors that is simply irresistible. So, gather your loved ones, whip up a batch of these delectable tartlets, and watch as they disappear within moments, filling the air with the aroma of cinnamon and warmth. These Dutch Apple Pie Tartlets are the perfect way to spread joy and create lasting memories with your friends and family.
FAQ
1. Can I use store-bought pie crust for the tartlet shells?
Yes, you can definitely use store-bought pie crust for the tartlet shells if you’re short on time or prefer the convenience. However, homemade crust tends to be flakier and more flavorful. If you have the time, we recommend making your own crust for the best results.
2. Can I prepare the apple filling ahead of time?
Absolutely! You can prepare the apple filling ahead of time and store it in the refrigerator. This can be a time-saving strategy, especially if you’re preparing for a large gathering. Just make sure to cool the filling completely before filling the tartlet shells to maintain the ideal texture.
3. Can I freeze the tartlets before baking?
Yes, you can freeze the unbaked tartlets for future use. Once you have assembled the tartlets, place them on a baking sheet and freeze until they are firm. Then, transfer them to a freezer-safe container or bag. When you’re ready to bake, simply remove them from the freezer, allow them to thaw slightly, and bake as instructed.
4. How can I store leftover tartlets?
If by any chance you have leftover tartlets, they can be stored in an airtight container at room temperature for up to 2 days. To maintain their crispness, you can also store them in the refrigerator for up to 4-5 days. Before serving, you can reheat them in a low oven for a few minutes to restore their warm, fresh-out-of-the-oven taste.
